Saturday, March 24, 2012

Adding the HardTail, Part 2


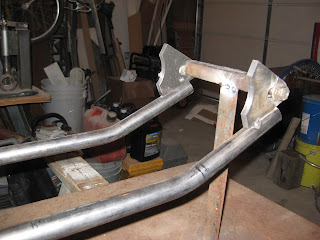
So the last entry covered in a basic way, the steps taken to form and attached the lower rails of the hard tail. Next, the upper rails must be formed and fitted. I used EMT to mock up the tubes and make sure the angle to the axle plates was correct. The hardest part to building the tubes is making sure the parts will line up with each other vertically. I used the table as a flat reference to check the tubes, using a framing square. I tacked each side up the to the back bone and double checked how they lined up with the lower rails. Then I "eye balled" them to make sure they lined up with each other horizontally.

After everything looked good, I put some more substantial welds at all the joint to hold things together. The next step for me is to find a fender and figure out how to attach it in a semi cool fashion.

Wednesday, March 21, 2012

Adding the hard tail, Part 1

So to start, I put the axle plates in my jig to hold their relative position. The I used some inexpensive EMT tube from Home Depot to mock up the angles of the bottom tubes that form the hard tail. I placed the wheel in position to try to get an idea of the proportions to make sure it was what I wanted.
After getting the angles pretty close, I bent my "real" tube into the shape I needed. I used a magnetic angle finder to determine the angles on the table and then used it to make sure I hit the right angles on my bender.
I used a framing square to make sure the frame was plum and perpendicular to the table as well as centered on my jig centerline.
The frame around the engine was not parallel with the centerline of the bike, so a small kink in the bottom rails was required to make them not flare out. After this adjustment was made, the final bend up was made the parts tacked together.
This concludes the construction for the bottom rails, now the top rails must be bent and fitted to the frame. It is finally starting to look like something:)